Wednesday, September 28, 2011

Birthday treats and applesauce

Hey friends! Did you miss me? Worry that I forgot about you? Maybe I went AWAL?

I know it went dark there for about a week worry not I'm back. More good news, I have my favorite apple sauce to share with you all.

Oh wait, you wanted to hear about my birthday. My apologies. That was rude.

I had a wonderful birthday that was filled with good food and a few special treats from the boyfriend. We did a little hiking, got away for the night, and went out to eat. Not in that order. It was such a special birthday.
Additionally, I have fun plans for a fun-filled birthday wine-tasting with friends this weekend! Yes!  My goal in life is to stretch my birthday out for as long as acceptable. I'm at a week now. Next year I turn thirty, maybe I can make it an entire month-long celebration.

Back to this year's birthday, on our way out of town we stopped at my favorite, and incidentally the only, Parisian bakery in town for a treat. This place is to die for! Let's just say it is a rare treat we go to Sarah's Patisserie. I was so pumped when he told me the plan. It was so hard to choose what treat to get. The flaky croissants both plain or almond looked butter-licious and like I could crawl inside it's beautiful layers and die a happy woman. Then there were macaroons - the French variety and not the coconut variety - that I adore. They are so delicate and feminine and perfect. The chocolate dipped ginger and chocolate dipped fruits were taunting me. Ultimately we had to choose just one treat for the trip.  We both decided on the most adorable chocolate chip monkey bread.


So number one, I died when I saw this. How brilliant is this? How have I not thought of chocolate monkey bread? Gah! And number two, for the record it tasted even better than it looked. It was perfectly moist and had the most satisfying balance between the gooey-melty chocolate and the cinnamon-sugar swirls.

We settled in for some coffee and muffins and enjoyed the best weather of our get-away and it less than a mile into our trip. C'est la vie. The get away was sweet and always nice to recharge. Oh and to celebrate my birthday of course.  I don't think I've mentioned how much I like birthdays have I?

In other news, remember when I said I'd share the fruits of our apple-picking labor.


The above turned into the most glorious applesauce.


Wanna know what's in it?

Drum roll please.....

Apples

and

cinnamon.

That's it.

Rough chop as many apples as you can stand to peal and slice. Dump slices into a pot and turn heat on low. Sprinkle generous amount of cinnamon on top. Stir. Simmer until you reach your desired thickness. I prefer my sauce a little chunky. The apples are so delicious and in season, no need to add any sugar.

Speaking of sugar, one of my favorite ways to enjoy this applesauce is served warm on top of vanilla ice cream or frozen yogurt. Sadly, I had neither on hand that day.

Anywho don't wait, make this applesauce today. You will love it.

Thursday, September 22, 2011

Acorn Squash Lasagna

So you say it's your birthday (nanananana), it's MY BIRTHDAY TOO - yeah! Name that song...

Well besides being a song from one of my favorite bands it is in fact my birthday. I love birthdays in general and of course I love my birthday. I cannot wait to share with you fun birthday activities that are planned, of course once I find out what those are....it's a surprise to me isn't that fun?!  Stay tuned for that and in the meantime enjoy my acorn squash lasagna experience.

I have a confession to make. In the past year or so I've developed a serious love-affair with lasagna. In the three short months of my little blog I've already talked about a vegetable lasagna  that I love.  It's a funny thing because I am not talking the red-sauce and meat lasagna variety. I enjoy that lasagna just fine but I love asparagus in my lasagna or a béchamel sauce laden lasagna because really what's not to like about that?

So this week when we got an acorn squash in the CSA I started searching the good ole internet for inspiration. Naturally, I was drawn to Martha Stewart's Acorn Squash Recipe. Now here's the catch about this recipe, it has multiple steps and it adds up to be fairly time consuming. This is why I would characterize this as a weekend recipe. But if you are anything like me you won't mind the time because it is worth the effort!

Step one


Roast two whole acorn squash. Now you could zip these in the microwave and cut the time in half. I think this is the wrong way to go. First, you only save about 30 minutes in comparison to the 60 minutes in the oven. Second, I think you lose the depth of flavor roasting can develop. So no pressure but make the right decision and I think you know what that is.

Step two


Gotta prepare the squash. Now Martha recommends using a food processor but I decided on a blender because I'm the decider. I sprinkle in a little nutmeg in because it is a nice fall flavor and Martha said to do it. So a tip about preparing the acorn squash, let it cool off just a bit. Seriously no one needs to burnt finger tips.

Step three


Prepare the cheese filling - ooh cheese! This is fat free ricotta and grated parmesan with fresh sage. Also, I parboiled the lasagna noodles at the same time.  Now we're ready to assemble.


Step four


The layering of this lasagna is a little different than you might expect. It goes a little something like this, squash--noodles--cheese--noodles--squash and so on. Make sure to end with a cheese layer and top with a little extra parmesan then pop in the oven to bake.

Step five


Now it's time to admire the fruits of your labor. Doesn't that pan look so yummy and inviting. Aren't you just dying to cut into it and take a bite? This is absolutely not the right thing to do. Unless you enjoy molten squash in your mouth. Give it a few minutes to reach a more manageable temperature. I speak from experience people, I suffer for you so that I can share my wisdom.

I hope you enjoy this dish as much as I do!

Acorn Squash Lasagna
Adapted from Martha Stewart

Serves 6

Ingredients
2 whole acorn squash
4 teaspoons oil
1/2 teaspoon nutmeg
8 whole wheat lasagna noodles
15oz. fat free ricotta cheese
1 cup grated parmesan cheese
4-5 sage leaves minced
salt and pepper to taste
nonstick cooking spray

Directions

Prepare the acorn squash by cutting each in half and rubbing each half with 1 teaspoon oil and salt and pepper to taste. Bake in preheated oven to 400 degrees for one hour or until the squash is tender. Set aside until cool enough to handle.

Zip squash in a blender or food processor and season with nutmeg. Squash should be smooth.

Parboil lasagna, boil for 5-8 minutes. In the meantime, prepare the cheese mixture. Combine parmesan, ricotta, and sage together.

Spray 8 by 8 baking dish with nonstick cooking spray. Begin assembling the lasagna start with squash layer then noodle layer then cheese. Repeat twice and end with cheese. Feel free to top with additional parmesan this will help brown up the top.

Bake in preheated 400 degree oven for 45 minutes with foil. Uncover and bake an additional 20 minutes. Allow to cool for 10 minutes before serving.

Enjoy!

Monday, September 19, 2011

Turkey Meatloaf

I love comfort food and when the summer weather gives way to cooler autumn nights I'm firing up my comfort food recipes. One of my favorite comfort foods is meat loaf. I know this is not the most visually appealing food and it doesn't bring the creamy-goodness of macaroni and cheese but I love meat loaf. If you have been reading this blog you know that I generally try to eat healthy in both the caloric sense but also heart-healthy. For that reason, red meat is a rare treat in my world. I will give you my recommendations for how to get the best bang for your buck with this recipe.

I have made this turkey meat loaf for several years and I still love it as much today as I did the first time I made it. Now there is one major problem with turkey meat loaf namely that it has the propensity to be dry. Fear not I have a solution - grating veggies into the loaf mixture. Enough of my ramblings, let's get on with the show.

Step one


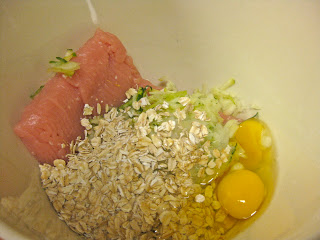
Choose a ground turkey of your choice. I used 99% fat free ground turkey. If your goal is to make a healthier meat loaf my recommendation is to use a similar grade of ground turkey, often ground poultry can be just as high in fat and calories as beef so pay attention to the label.

Also, grate the veggies. I used zucchini and onion.  I bet carrots would be fabulous as well.

Step two


This is the fun part, mixing in all the other goodies. As you can see I prefer oatmeal in my meatloaf. If you prefer bread crumbs I recommend the whole wheat variety. I really love oatmeal in my meatloaf. First, I think it's a heartier grain. Second, it's a whole grain (read: heart healthy).  I know some people love white bread soaked in milk but give this version a try and you will not be disappointed. Also, how yucky is that mental picture of milk-soaked white bread? Blech.

Next, the eggs. Because turkey meat loaf requires grated veggies that are chocked full of water and then oatmeal to balance the amount of moisture I use two whole eggs to help bind it. If you prefer I think egg whites would work. However, because it's so low in fat I use the whole egg. A little extra fat will help you feel satisfied when you eat it.

Finally, my favorite part...the ketchup! I have a serious problem/love affair when it comes to ketchup. Also, that is what makes meatloaf a meatloaf! So pour a little in until you think there is enough and then squirt a little extra in for good measure. You will not be disappointed.

Step three


Spray the bottom of the pan with nonstick cooking spray and plop in the meatloaf. Form the familiar loaf shape. Top it off with glorious KETCHUP!

Pop it in the oven preheated to 350 degrees for about an hour.You'll want to check on it depending on how thick you make your loaf. Because we're cooking poultry here it needs to be thoroughly cooked.


I do not play around with this and use an instant read thermometer making sure it reads 165. When this puppy came out it was around 159 or so and continued to rise in temperature until it landed squarely on 165  - how perfect is that?

Now on to enjoy the fruits of my labor.


I served some roasted root vegetables along side of the loaf, specifically carrots, parsnips, and sweet potato. Also, I confess I added more ketchup to this slice after I took a picture. Lest you think my love of ketchup waned. I wanted you to know the full extent of my problem.

I hope you love it as much as I do!


Turkey Meatloaf
6 Servings

1 lb. 99% fat free ground turkey
1 medium zucchini grated
1 small onion grated
1 cup oatmeal
2 whole eggs
1/3 cup ketchup
salt and pepper to taste
ketchup for topping
nonstick cooking spray

Begin by preheating the oven to 350 degrees and preparing the baking pan with nonstick cooking spray.

Use a box grater to grate the zucchini and onion.

Combine turkey, zucchini, onion, eggs, oatmeal, ketchup, and salt and pepper in medium bowl. With clean hands mix until combined being careful not to over mix.

Transfer mixture to baking pan and form into loaf. Top with ketchup.

Bake for 1 hour or until an instant read thermometer reads 165 degrees.

Enjoy!

Sunday, September 18, 2011

Squirrels are fun

This weekend has been both fun-filled and a whirlwind. Saturday we headed out of town to visit Joel's family and to make a pit stop along the way for a little apple picking. As we're loading up I noticed this license plate.


Naturally, this sighting made me think of this video.


For the record both Joel and I are pro this little peanut playing with the dead squirrel or better yet squearlll as she pronounces it. Nay sayers, her father eventually makes her part way with the dead pest.

After the squirrel license plate we did a little of this.


As you can see there was roughly a 2:1 ratio, okay okay more like a 4:1 ratio of how many Joel picked and how many I picked. The weather was beautiful and we were ambitious and ended up with this.


That's right we picked one whole bushel because we're insane. We were able to unload a full bushel with Joel's family. Sharing = caring.

Funny story while we were at the apple orchard. I went to use the rest room and I politely knocked to check on its occupancy. Upon my knock, a small chorus of little voices sprang up, "we're locked in here." I tried to jiggle the door without success. Luckily, a staff member at the orchard was not far away and was able to spring the little bunch. Three little doe-eyed 8 year old girls sprang free. The worker-bee vowed to put up a sign, as it turns out this was not the first bunch to be locked in. Oy!

Alright, as you can see from the photos above I have my work cut out for me. I'm off to make applesauce and perhaps other apple-related goodies. Posts to follow.

Wednesday, September 14, 2011

Zucchini muffins

Many of my friends as well as many bloggers describe their approach to attempting new recipes with careful consideration to the original recipe. Specifically, my dear friends tend to follow the recipe to the letter the first time before offering tweaks or adjustments that suit their fancy. This my dear friends is in fact the safe way to go and sometimes known as the "correct" course of action.

I, of course, being difficult most of the time dismiss caution and adapt the recipe as I see fit. From. The. Start. There, take that.  

Typically I am motivated by one of three things. First, often a recipe asks me to use several bowls, sift some ingredient together, walk it in a circle three times, and let it rest for a to-be-determined amount of time. Here's what is wrong with that scenario. 
A. I do not currently own a dish washer - enough said. 
B. Sifting and extra bowls is more work and thus for chumps.
C. Who comes up with this stuff? Did the dough just get a work out and now it needs a rest? Should I allow for a cool down and stretch too? 

The second major reason I may not follow a recipe to the "tee" or is it "tea" or maybe "T" - dear friends please help me. Like I was saying, the second reason is often general forgetfulness and lack of preparation in terms of specific ingredients.   

The third, and final reason, being that I have an inflated sense of my cooking ability and think I can tell what is critical in a recipe and what can easily be swapped. Well as good fortune has it I am most often met with success. This obviously only further emboldens me which brings me to the zucchini muffins I am going to share with you. 

In an effort to make a lighter muffin and to incorporate more zucchini into the bread I decided to swap out the oil that Martha called for with applesauce and to just throw in as much grated zucchini as my little paws could grate. 

The result: 


Ok so that doesn't look terrible. You may be thinking, hmm maybe Amy's carelessness and general lack of respect toward Martha Stewart's tried and true recipe resulted in a delicious and lower calorie alternative. However, if you glanced up and noticed I titled this post "Zucchini Muffins" and not "Zucchini Bread" you may have already guessed correctly that something went terribly wrong with the bread. 

So here's the ending of this little tail. I turned over the loaf and to my shock and horror the crusty outer shell was hiding a not fully cooked gooey middle. Oh boy. I then shoved the bread back into the pan and attempted to smush it together again and popped it back in the oven. Luckily, Joel is crazy about quick breads and ate this little puppy in 26 hours. I am not kidding. 

Here is the thing I failed to consider, baking is essentially chemistry and probably the ingredients that someone thoughtfully combines is meant to produce a desired reaction, specifically being cooked.

Lesson learned right? Well, not really. I simply adjusted the already adjusted recipe I used for the bread. That sound you just heard is your own hand hitting your forehead after discovering I am doomed to learn everything the hard way. 

My solution was to attempt the same recipe but bake the bread in the form of muffins. Ultimately, the first attempt's batter contained too much moisture and resulted in an overly crusty exterior to its under cooked interior. I am thrilled to report my trial and error paid off! Check it out. 

Step one: 


Grate zucchini into a large bowl. Add sugars, eggs, vanilla, and applesauce then stir. 

Step two: 


Sift dry ingredients over the bowl of wet ingredients. Stir to combine. Do not over stir. 

Step 3: 


Plop in muffin pans previously sprayed with nonstick cooking spray. Bake in oven. 

Step 4:


Enjoy their spicy-zucchini goodness! 

A quick note about this recipe. For those of you who are dying for fall and are enjoying the slight chill in the air lately this recipe is for you. It is chocked full of spices that remind you of fall and the coziness that implies. It is most definitely my favorite zucchini bread of the moment!

Lower-fat Zucchini Muffins
Adapted from Martha Stewart 

Servings: 12-14

Ingredients

  • Nonstick cooking spray
  • 1 large zucchini
  • 1 cup packed light-brown sugar
  • 2 tablespoons granulated sugar
  • 2/3 cup applesauce
  • 2 teaspoons vanilla extract
  • 2 large eggs
  • 1 1/2 cups all-purpose flour
  • 1/2 teaspoon baking powder
  • 1/2 teaspoon baking soda
  • 1 1/2 teaspoons ground cinnamon
  • 3/4 teaspoon ground nutmeg
  • 1/4 teaspoon ground ginger
  • 1/8 teaspoon ground cloves
  • 3/4 teaspoon salt

Directions

Preheat oven to 350 degrees. Spray muffin tin with nonstick cooking spray and set aside. 

Grate zucchini using a box grater into a large bowl. Add sugars, eggs, vanilla, and applesauce to bowl. Mix until combined. 

Place large sifter over the bowl and measure flour, baking powder, baking soda, cinnamon, ground nutmeg, ground ginger, ground cloves, and salt. Sift dry ingredients into the wet ingredients. Stir until just combined. 

Using an ice cream scooper evenly distribute mixture into muffin tins. Bake for 20-25 minutes or until a wooden toothpick comes out clean. 

Let cool for 10 minutes and enjoy. I enjoy smearing low fat cream cheese on my lightly heated muffin. 

Enjoy! 

Monday, September 12, 2011

Eat your veggies Monday

Happy almost-fall everyone! This weekend there was a chill in the air and the leaves are so close to changing their green hue to the vibrant reds and oranges of fall. The weekend weather inspired me to do some fall cooking chocked full of comfort.

Also, we had beets. Ugh.

The beets were fixin' to get right in the way of my weekend. I happened to stumble on a new recipe - thanks pinterest - that was promising.


I discover these are beet chips. I think, "eh, worth a try." As seen here I've been down the beet path before and walked away with the beet-dirt taste in my mouth. Blech.

The recipe is a Martha Stewart original and Martha has not steered me wrong with previous recipes I've tried of hers.

Step One: start with the beets.


Is it just me or do beets look a little like a rats tail? The long tail on the end of the beets get to me.

Step Two: wash thoroughly.


Folks this is the difference between natural light and kitchen light. Whoa. Anywho, Joel convinced me to not peel these puppies which I agreed to as he sighted additional fiber and whatnot in the skin. For that reason these really needed a scrub.

Step Three: Slice thinly.


This is where the beets always reel me in, look at the beautiful and vibrant red of the inner beet. Also check out the knife, beet juice would be a good halloween prop for blood. Martha recommends a mandolin to slice the beets but I do not currently own one so a knife worked pretty well. Do the best you can.

Step Four: toss in oven.


I tossed with a small amount of olive oil (1 teaspoon) and a little sea salt. 

Martha recommends baking at 350 degree oven for 20 minutes and flipping the beets and returning for an additional 10 minutes. Because my knife doesn't slice these little guys as thinly as a mandolin slices I kept them in the oven until the edges started to dry out and get crispy. This took an additional 15 minutes but really just keep an eye out. 


The verdict: umm you guys I really enjoyed these! Can you believe that? I found myself snacking on these little treats while I cooked dinner. The crispier the better and I also enjoyed the thinner beet chips most likely because their beet flavor was less dirt-like.

I am so happy I found a beet recipe I enjoyed! I think I will make beet chips with beets forever more.

Give them a whirl and let me know what you think.

Enjoy!


Thursday, September 8, 2011

Minestrone

Upstate New York is literally under water. The flooding is just terrible and scary and reminds me of how powerful Mother Nature is. Fortunately, my family is safe but lots of people are not as lucky. I sincerely hope everyone stays safe.

In other news, autumn is in the air. At least in my neck of the woods. Since soup and I are bff's 4ever or is it truLov4ever? I can't keep up with the cool kids and their sayings. My point is, me + autumn = soup. 

I'm working on a record for cheesiness in one post, how am I doing?

One of my dearest friend's mother made this minestrone while I was in college and visiting her family. I fell in love with this version. Prior to this I had only had canned minestrone with "eh" as my reaction most often. As it turns out the recipe is from the Joy of Cooking. That Christmas I requested and received the book for this recipe alone. True story. I have used the book for other recipes but most often it is for this minestrone.  One of the major draw backs in my expert err humble opinion of the Joy of Cooking is the complete and utter lack of photos. Thumbs down for a cook book.

Well after that rousing assessment that you couldn't live another moment without - you are most welcome - let's move on to the good stuff. The food! 

Step one: start with a mirepoix saute.  


Use mirepoix with your friends, you'll sound fancy when in fact you're using the French phrase for onions, carrots, and celery.

Step two: add more veggies. 


This is the part when things start getting good, half a head of green cabbage shredded and some dark greens. O.M.G. The cabbage makes this dish and I never would have considered adding cabbage to minestrone. Do not skip the cabbage, you will ruin this dish and possibly the rest of your day. Trust me on this one. 

Step three: add beans and liquids. 


Step four: add the pasta.


Step five: add parmesan cheese and enjoy.


Minestrone
Adapted from the Joy of Cooking

Ingredients: 
1 tablespoon olive oil
1 medium onion, chopped
2 large carrots, chopped
2 medium celery, chopped
dried herbs - italian blend - basil, parsley, or whatever you have on hand
1 cloves garlic, minced
1/2 small head cabbage, chopped
3 Swiss chard leaves washed, dried, and chopped - other greens will work too
14 oz. can of diced tomatoes
16 oz. can of pinto beans or white beans
10 cups chicken or vegetable stock - I use an organic no salt added variety
4 oz. orzo (about half a cup)
2 teaspoons salt
ground pepper to taste
parmesan to top the soup

Directions: 

Heat a Dutch oven or large pot over medium heat and add olive oil. Toss in mirepoix (onion, celery and carrots) add a pinch of salt and pepper to taste and and cook until onions are almost translucent about 7 minutes. Add garlic and cook for 2 minutes. 

Add tomatoes and cook for 5 minutes. 

Toss in cabbage and greens with Italian seasoning. Saute for 5-8 minutes. Add beans and stock. Simmer for 30 minutes until the vegetables are tender. 

Add orzo and continue simmering for 15 minutes. 

Ladle into soup bowls and add grated parmesan to taste. 

Enjoy! 

Wednesday, September 7, 2011

Little Miss Domestic-Goddess

I have a problem. It's a problem I'm ashamed of and need to confess.

I. Kill. Plants.


I've had this plant for a few years and over the past month or two it's really taken a turn for the worse. As you can see today's blog post title may be misleading. I really love houseplants but over the past year I've killed no less than 4 - the horror!

I dream of this:


I love the window with all of the plants. How cute is that little dog? I just know that little pup is beaming because of the plants.


Terrariums are so popular this year and I must say I understand their appeal. Like many things it took me a while to warm up to them but now I appreciate their appeal. They are a little greenhouse inside. I want one.


I love a ficus tree. I think this one is beautiful. Perhaps a bit too big for my current space but someday I will have an inside tree...that lives.


Maybe a chia pet is more my speed considering my current track record? Gah! I hope to turn this curse around.

Are you into house plants? What have you had the most success with?

Have a good day!