Monday, October 31, 2011

Pumpkin Pecan Bread

I said I would do a week of pumpkin-themed recipes. Ummm, it turns out I didn't mean one week. But, I can redeem myself with this bread. I really loved this bread and as it turns out it's a cooking light recipe so it's not as bad as it could be since it's a quick bread.

As an aside, I just want to say out loud or at least on the blog that I am so grateful that this fall has been a real fall. We dodged the weekend snow. But in general the temperatures have been cool but not frigid and the trees on the leaves have been putting on a show! Last weekend we went on a last-good-weekend hike. We are so lucky to live here.  Here are some photos I snapped.


These photos may help me through the long winter.

Alright, on to the recipe.

Step one:


The main players.

Step two:


Measure and combine the dry ingredients. This happens to be one of those recipes when I do adhere to the two-bowl preparation rule here. As it turns out, it's completely worth the extra dirty dishes.

Step three:


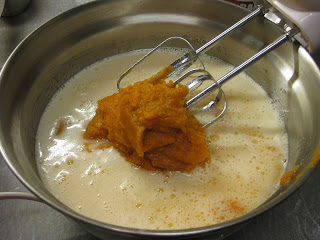
Mix the wet ingredients until combined.

Step four:


Pour the wet ingredients into the dry. This is the way to go for a few reasons the main being that if you poured the dry into the wet you would have a big fat mess on your hands when you mixed together. You may also notice this is quite a  lot of batter well this recipes makes two loafs. Bonus!

Step five:


Pecans! How much do I love thee? Also, for added difficulty I have both a glass and metal loaf pans. I say added difficulty because they are slightly different sizes and the glass and metal hold and conduct heat differently making the baking time different.

Pop these into the oven until a toothpick comes out clean. Allow them to cool a bit and then devour immediately. I took one to a party and the other I hid from Joel so that he didn't eat the whole thing within an hour. That man seriously loves quick breads.


Enjoy!

Pumpkin Pecan Bread
Adapted from Cooking Light

Ingredients:


  • 3 1/3 cups all-purpose flour (about 15 ounces)
  • 1 tablespoon baking powder
  • 2 teaspoons baking soda
  • 1 teaspoon salt
  • 1 teaspoon ground cinnamon
  • 1 teaspoon ground nutmeg
  • 1/2 teaspoon ground allspice
  • 2 cups granulated sugar
  • 1/2 cup egg substitute 
  • 1/2 cup canola oil
  • 1/2 cup low-fat buttermilk
  • large eggs 
  • 2/3 cup water
  • (15-ounce) can pumpkin 
  • Cooking spray 
  • 1/3 cup chopped pecans
Preparation: 

Preheat oven to 350 degrees.  Spray nonstick cooking spray into loaf pans. 

Measure and combine flour, baking powder, baking soda, salt, cinnamon, nutmeg, and allspice (which I did not have on hand but it still was delicious). Stir to combine and set aside. 

In a medium bowl measure sugar, egg substitute, oil, buttermilk, and eggs. Beat with whisk or hand mixer. Add pumpkin and water and beat together. 

Pour wet ingredients into dry and mix until combined.  

Divide batter between two pans. Top with pecans. Bake for an hour. When a toothpick comes out clean they are done. Let cool for 20 minutes before you enjoy. 

Wednesday, October 19, 2011

Pumpkin Gingersnap Cookies

I love lots of aspects of fall, the crisp days and cozy nights, the beautiful and vibrant colors of the leaves on the trees, and of course the delicious food. One thing that I'm not crazy about is Halloween. I know, I know, this is very bad. I know lots of people who go ga-ga over the holiday but it really isn't my thing. In large part because I'm not all that clever with costumes. I often see costumes and fall on the ground in utter amazement. I'm so jealous of their creative genius. Ah well, this is my lot in life. Even so I will attend a Halloween party on occasion. And of course, I love Charlie Brown and the pumpkin patch.

One thing I know I love about fall - and every other time of the year - is cookies. I love all cookies and like many desserts am drawn to the chocolate variety. But, I also really love ginger cookies of all varieties. As I've mentioned before I especially love an orange ginger cookie a local coffee place used to sell. I'm still very sad about that development. Anyway, this is a happy post so on to the cookies.

As you know this is pumpkin-week in my life so naturally these are pumpkin flavored cookies. Added bonus this recipe in combo with the pumpkin shake uses a whole can of pumpkin puree so no waste!

A note about these cookies. They are of the moist and soft variety. I must say I generally prefer chewy cookies but these are so delicious and I really love their softness.  They are best with vanilla frozen yogurt or ice cream - and really what dessert isn't best a la mode?


Step one:


Assemble the cast

Step two:


Cream the butter and sugar

Step three: 


   Combine the remaining wet ingredients 

Step four: 


Mix in the dry ingredients 

Step five: 

Let it cool in the refrigerator for an hour or more.  Gah! Why don't I ever read the directions all the way through before I start...I was making these four my book club and really only had an hour to allow the dough to firm up in the fridge. 

Step six: 


Roll into balls and cover with granulated sugar. Cook 'em up! 


Minus my recipe-reading mistake these turned out fabulous. The ladies at the book club loved them and so do I! 

Pumpkin Ginger Snaps 
Adapted from Two Peas and Their Pod

Yields 3 dozen cookies

½ cup of butter, at room temperature
1 cup granulated sugar, plus more for rolling the cookies
½ cup of pure pumpkin (I used Libby's canned pumpkin)
¼ cup of molasses
1 large egg
1 teaspoon vanilla extract
2 ⅓ cups all-purpose flour
2 teaspoons baking soda
2 teaspoons cinnamon
1 1/2 teaspoons ground ginger
1 teaspoon ground cloves
1/2 teaspoon salt

Directions: 

Mix butter and sugar until creamed with an electric mixer. Add pumpkin pure, molasses, egg, and vanilla to mixture and combine. 

Sift together the flour, baking soda, cinnamon, ground ginger, cloves, and salt. Slowly add to the wet mixture until just combined. Refrigerate for at least one hour and as long as a couple of days. This is important as it will firm up the dough before you roll the cookies into balls. 

Preheat oven to 350 degrees. Roll the cookie dough into tablespoon-sized balls or use a small cookie-sized ice cream scoop. Roll into granulated sugar to coat the outside of the cookie. Place on cookie sheet and I would recommend using a silpat or parchment paper to line the sheet. Bake for 10-12 minutes. Allow a few minutes on the sheet to cool before transferring the cookies to a wire cookie rack. 

Enjoy! 


Monday, October 17, 2011

Pumpkin everything!

I've finally accepted the harsh reality that we are in the middle of fall - and by extension on a quick march to winter  - it's the winter part that can bum me out.  However, I've fully embraced the season and have throughly enjoyed all things autumn.

You guys, I love a theme. I mean I really love a theme. This week as I was planning my grocery list for the week I was inspired by the vegetable of the season....pumpkin! For the past couple of weeks I've been enjoying pumpkin coffee but that was just the start. I know there are approximately 4.9876 million pumpkin recipes rattling around the web. So I thought I'd add to the clutter umm I mean party.  Throughout the week I will share four pumpkin recipes! Get excited people.

Today's feature is a pumpkin smoothy.


Pretty right? Don't be afraid the pumpkin flavor is muted and not overwhelming thanks to the other ingredients.

I happened across this recipe thanks to pinterest and Redhead Recipes. Check out her site for the original post.  I tweaked her recipe a little bit. I omitted the ice mostly because I forgot about it but it made the smoothy a desirably thick treat. The result was delicious and produced 3 servings.

My version used:
2/3 cup pumpkin puree (the out of the can variety)
1 cup fat free greek yogurt
1 1/2 frozen bananas
1 cup skim milk
a good shake of cinnamon, ginger, cloves

Then just zip it through a blender and enjoy!

In other autumn-loving news Joel and I recently went through a corn maze. It the first time for both of us in the fall-favorite. It was really fun.  The maze even had a riddle you could solve with clues throughout the 3.5 mile maze! This ain't your mama's maze.  Actually, I have no idea if that's true since this was my first corn maze but it really was fun.


Here we go! 


Joel has the map. Where are we going?


A view from inside the maze.


A clue! 

What fun fall-themed activities or foods have you enjoyed?


Monday, October 10, 2011

Banana pancake oatmeal

I just realized I have never talked about oatmeal on the blog -  zut alors! Oatmeal is such a central part of my life and I eat it for breakfast easily 4 times a week. I have strong feelings about oatmeal and generally stick with what I know in terms of toppings.

My rules about oatmeal:
1. No flavored oatmeals! I much prefer the rolled oats and add what I like to it. Also, I've noticed the oats are much hardier for whatever reason the flavored packs' oatmeal is sliced into tiny pieces. Strange. Added bonus, the rolled oats in the big round barrel packaging is much, much cheaper.

2. Steel cut oats are a fun weekend treat. I'm weird. End of story. But seriously, if you haven't tried steel cut oats give them a whirl. They take longer to cook, hence the weekend part, but are chewy and awesome.  I typically buy steel cut oats in bulk rather than in the oatmeal isle because they are cheaper in bulk.

3. Add delicious toppings and enjoy!

Like I said I am generally fairly boring in my toppings and was even in a rut. Most days I add 1 tablespoon of peanut butter, frozen blueberries, and milk. If I remembered I may add a dash of cinnamon. When we had a plethora of apples I would substitute a chopped apple for the blueberries for some crunch.  That's about as crazy as I got.

Well this weekend inspiration hit and I made this:


How amazing does that look? I'm calling it banana pancake oatmeal and it was heaven. I'm obsessed. I'm breaking out of my oatmeal rut and exploring other possibilities. Stay tuned, I am thinking this needs to be a regular feature of the blog. How perfect is that for fall and *gulp* winter?


So what is in it? Steel cut oats, half a sliced banana, 2 tablespoons of chopped walnuts, and 1 tablespoon of real maple syrup. In all honesty, this bad-boy could handle a whole sliced banana but do what you like.

Now it's your turn.

Whip it up and let me know what you think!

What is your favorite oatmeal?

Saturday, October 8, 2011

Apple Streusel Coffee Cake

Last weekend was chapter two in my birthday celebration extravaganza. The plan was to go on a wine tour on Seneca Lake. This isn't one of those we'll rent a bus and spend 12 hours wine tasting type of tours. It was a have a couple of designated drivers and load up a couple of cars variety. There are few activities I can imagine spending the better part of a day doing. As a matter of fact I cannot think of one really.

For that reason I planned a wine tasting trip to be around 5 hours including the 2 hour round trip drive to the lake, leaving around 3 hours of tasting.  Nonetheless, a car ride plus wine tasting called for a snack.

 I had two criteria of what the treat needed to include: apples and a streusel topping. It was my birthday and a streusel topping was nonnegotiable. Also, I knew my snack had to include apples since we were still busting with apples from our apple picking adventure a few weeks before.  I surfed the web and perused a few cookbooks until I landed on my The Williams-Sonoma Baking Book.

 As an aside, I love all cook books that include many pictures of what I may or may not make. I think the Barefoot Contessa does a wonderful job at including the pics and therefore I have four of her books. It goes without saying that the Pioneer Woman makes sure her recipes are chocked full of photos. Good news about the Willams-Sonoma cook book every recipe is accompanied by a glossy picture of the goods.

Anywho, although I enjoyed the photo features in WS Baking Book, it did not produce a treat that met my criteria. However, it did have an easy-looking recipe for peach streusel coffee cake and since I change recipes at will I thought I'd have apples substitute for the peaches.

Take a look at the results.


I died. Joel could barely stay away and my wine-tasting friends loved them.

Here's how I did it.

Step one:


Gather up the participants in todays culinary adventure. Please note the surprise ingredient, almond extract, that I was not sure how it behave with apples rather than peaches but I was fearless and forged ahead.

Step two:


Work it out. Get the all-star streusel topping ready. Set aside. Better yet, pop her in the fridge cold butter is key to good streusel.

Step three:


Whisk it. Now whisk it good.

I'm going for a high cheesy factor today. How'm I doing?

This is the part of most recipes they ask you to use multiple bowls. I'm not going to do that. It is well documented that I detest using multiple bowls unless absolutely necessary. For those of you who do not currently have a dish washer, I know you feel my pain.

Don't be alarmed the cake batter is thick. This is good. The apples need to set gently on top of it and if it was runny this would be no bueno.

Step four:


Layer up! Easy as pie err coffee cake.  Pop this lovely mama into the oven for 40-45 minutes. Devoir immediately. Well let it cool off a bit but basically immediately. 

Enjoy the fruits of your labor! 


How adorable do these look all ready to go in their to-go container for our trip? Also, for the record, the almond extract was an amazing addition to the cake! Go with it. 


Apple Streusel Coffee Cake 
Adapted from The Williams-Sonoma Baking Book 

Makes one 9-inch cake

For the streusel: 
3/4 cup flour
1/2 cup packed light brown sugar
1/4 cup granulated sugar
1 tsp ground cinnamon 
6 tablespoons cold unsalted butter, cut into pieces

For the cake: 
1 1/2 cups flour
3/4 cup granulated sugar
2 tsp baking powder
1/2 tsp salt
1 egg
4 tablespoons unsalted butter, melted
1/2 cup milk
1 1/2 tsp vanilla extract
1 tsp almond extract
3-4 medium baking apples, peeled and sliced thin

Preheat the oven to 350 degrees or if using a glass baking dish (as I did) set over to 325 degrees. 

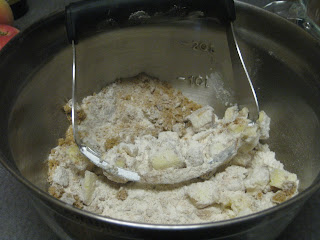
Measure the streusel ingredients into a bowl and cut butter into dry ingredients using a pastry blender, fork, or your fingers. The butter should be broken down to pea-sized bits. Set aside or in the refrigerator. 

Moving on to make the cake. In a medium bowl whisk together the eggs, melted butter, milk, vanilla, and almond extract for about a minute until the mixture is creamy. Sift together the flour, sugar, baking soda, and salt over the wet mixture. Stir until just combined and the batter is without lumps, over-stirring = disaster people. 

Prepare the baking dish with nonstick cooking spray. Spread the cake batter on the bottom. Gently place and press the apples in a single layer over the cake batter. Top with streusel. 

Bake until topping is golden brown and a tooth pick comes out of the center clean. This take about 45 minutes. Cool for 20 minutes before serving. 

Enjoy!  


Monday, October 3, 2011

Stuffed Acorn Squash

I was all set to share with you all the weekend birthday celebrations and the snack I made to accompany my wine tasting tour. It was going to be glorious and I was sure it would start your week off to the right start.

And then I made dinner last night.

It was so good. Knock your socks off good. I was over the moon. You get the idea.

I knew this had to be shared first.

Our CSA regularly includes winter squashes and I'm getting into the mood for fall. Good timing since we are more than a week into fall. As if I could forget with the weather taking a decidedly cooler turn. I am enjoying pulling out my sweaters and jeans. I am a little sad to see grayer skies and to put away my sandals. Luckily, I have this recipe to console my ambivalence about autumn.

Here we go.
Step one:


Cut the squash in half and pop 'er in the oven for half an hour.


Step two:


Cook up a rice blend that you like according to the package. I used this Wegman's brand rice blend and added sodium-free chicken flavor in the water to cook this to add flavor. This takes about 30 minutes as well.

Step three:


Prep the mixings. I used two medium apples with their skins left on, two celery stalks diced, and 1/2 cup chopped button mushrooms.

Step four:


Soften the mushrooms and celery for about 10 minutes. Just to develop their flavors. I also added a little poultry flavoring in this mix, just a touch, I used the stuff you might put on a turkey around Thanksgiving. It just felt like the right thing to do. Guess what, it was a good decision and you should do it too.

Step five:


Fold in the yum-yums. In addition to the celery, mushrooms, and apples, I threw in some dried cranberries and chopped walnuts. Now you could stop here and enjoy this as a delicious autumn side dish.

But, I had an acorn squash to stuff! Also, I had a bunch left over for lunches and a side dish for later in the week. Score!

Step six:


Bake the stuffed squash for 25-30 minutes to warm.

That's all folks. Now it's time to dig in.

How good does that look? It was oh so good.

I hope you try this. Let me know what you think!

Stuffed Acorn Squash
Yields 2 servings - with bonus left over stuffing

1 medium acorn squash
1 8oz. wild rice blend
2 medium apples, diced
2 celery stalks, diced
1/2 cup chopped button mushrooms, chopped
1/3 cup chopped walnuts
1/4 cup dried cranberries
1 tablespoon extra virgin olive oil
salt and pepper
dash of poultry seasoning
Nonstick cooking spray

Cut the acorn squash in half and scoop out the guts. Lay face down on baking sheet sprayed with nonstick cooking spray then bake in preheated 350 degree oven for 30 minutes.

In the meantime, cook the rice according to the package. To add a burst of flavor add chicken flavoring. I would recommend one of the no-sodium variety. Simmer for 30 minutes or until the rice is cooked.

Saute the celery and mushrooms in olive oil in pan over medium heat. The goal is to sweat the veggies which takes about 10 minutes. Be sure to salt and pepper and add poultry seasonings if you like to the vegetables. Remove from heat when finished.

Mix the celery, mushrooms, walnuts, dried cranberries, apples with the cooked rice. Scoop rice mixture into each acorn squash half facing up. Bake in oven for 25-30 minutes.

Enjoy!